

Introduction: Why Clean Coffee Grinders Matter for Superior Brews
A manual coffee grinder is the unsung hero in any coffee enthusiast’s arsenal. These precision instruments transform whole beans into perfectly sized grounds, giving you complete control over your brewing experience. However, even the highest quality grinder can’t perform at its best when neglected.
Clean grinders deliver superior flavor in every cup. Coffee beans contain over 1,000 aroma compounds and oils that, while delicious in your brew, can accumulate in your grinder and turn rancid over time. This buildup not only taints fresh beans with stale flavors but also interferes with the precision grind settings essential for espresso.
Proper maintenance provides several key benefits:
– Preserves the pure flavor of your specialty beans
– Maintains consistent grind size for optimal extraction
– Prevents clogs and mechanical issues
– Extends the lifespan of your investment
– Ensures hygienic preparation of your daily brew
This guide will walk you through why, when, and how to clean your manual grinder, ensuring you get the most out of your premium coffee equipment for years to come.
Why Regular Cleaning is Essential for Your Manual Grinder
Flavor Protection
Coffee oils are flavorful when fresh but quickly become rancid with exposure to air. These oils cling to burrs and internal components, creating a layer of old coffee residue that contaminates every subsequent batch. Even premium beans will taste bitter, stale, or simply “off” when ground in a dirty grinder.
Mechanical Performance
Beyond flavor concerns, coffee buildup creates physical problems. Fine particles accumulate in the grinding mechanism, creating friction and resistance. This buildup not only makes grinding more difficult but can cause uneven particle size—the difference between a balanced extraction and a disappointing cup.
Consistent Extraction
Proper extraction depends entirely on consistent grind size. As residue builds up in your grinder, it disrupts the precise gap between burrs, leading to inconsistent particle size. The result? Simultaneous over and under-extraction, producing coffee that’s both bitter and sour.
Longevity Investment
Quality manual grinders represent a significant investment. Optimal cleaning frequency directly impacts how long your grinder will maintain peak performance. Regular maintenance prevents premature wear on burrs and mechanical components, protecting your investment for years to come.
Health Considerations
Coffee residue is organic matter that can harbor mold and bacteria in the right conditions. Regular cleaning eliminates this hygiene concern, especially important in humid environments where microbial growth accelerates.
When to Clean Your Manual Coffee Grinder: Creating an Effective Schedule
Understanding when to clean your grinder is as important as knowing how. The appropriate schedule varies based on usage patterns, coffee types, and personal preference.
| Light Cleaning | Deep Cleaning |
|---|---|
| After each use | Every 1-3 months (based on usage) |
| Takes 30-60 seconds | Takes 20-30 minutes |
| Removes loose grounds | Removes oils and buildup |
| Brush exterior and chute | Full disassembly and thorough cleaning |
| Prevents daily buildup | Restores optimal performance |
Factors Affecting Cleaning Frequency
The schedule above provides a good baseline, but consider these variables:
Bean Oiliness: Darker roasts contain more surface oils that build up more quickly. If you primarily grind dark, oily beans, increase your deep cleaning frequency accordingly.
Usage Volume: Daily grinders need more frequent attention than occasional-use equipment. Someone grinding 30g daily will need to deep clean more often than someone who grinds weekly.
Noticeable Signs: Be alert for warning signs that indicate immediate cleaning is needed:
– Grinding becomes more difficult or inconsistent
– Coffee flavor shows unusual bitterness or staleness
– Visible residue appears on burrs or in grounds
– Unusual sounds during grinding
Following the essential steps for deep cleaning can restore peak performance when you notice these warning signs.
Essential Tools for Effective Grinder Cleaning
Proper tools make cleaning both efficient and effective. Here’s what you’ll need:
Soft Brushes: A dedicated coffee brush or clean paintbrush removes loose grounds and residue from hard-to-reach areas.
Microfiber Cloths: Lint-free cloths clean exterior surfaces without scratching and remove fine particles during deep cleaning.
Compressed Air: Optional but useful for blowing out stubborn particles from tight spaces without disassembly.
Grinder Cleaning Tablets/Pellets: Specially formulated to absorb oils and clean burrs without damage (great for periodic maintenance).
Wooden Skewers or Toothpicks: Perfect for removing compacted grounds from crevices without scratching metal parts.
Small Container: To organize tiny components during disassembly.
Clean Working Surface: A white towel provides both padding and contrast to help spot small parts.
For specialized situations, additional equipment for coffee grinder cleaning may be helpful, though these basic tools will handle most cleaning needs.
Step-by-Step Guide: Preparing for a Deep Clean
Proper preparation makes cleaning more efficient while preventing lost parts or damage.
Consult your manual: Different models have specific requirements—review manufacturer guidelines before proceeding.
Create a clean workspace: Lay a white towel or light-colored cloth on a flat surface to provide contrast and prevent parts from rolling away.
Empty the grinder completely: Run the grinder briefly to clear remaining beans and grounds from the burrs and chamber.
Gather your tools: Have all cleaning supplies within reach before disassembly.
Document the process: For first-time disassembly, take photos at each step to reference during reassembly.
Prepare a parts container: Small components can easily roll away—organize them in the order of removal.
Different types of manual coffee burr grinders may have specific requirements, so pay special attention to manufacturer recommendations regarding materials and cleaning methods before proceeding.
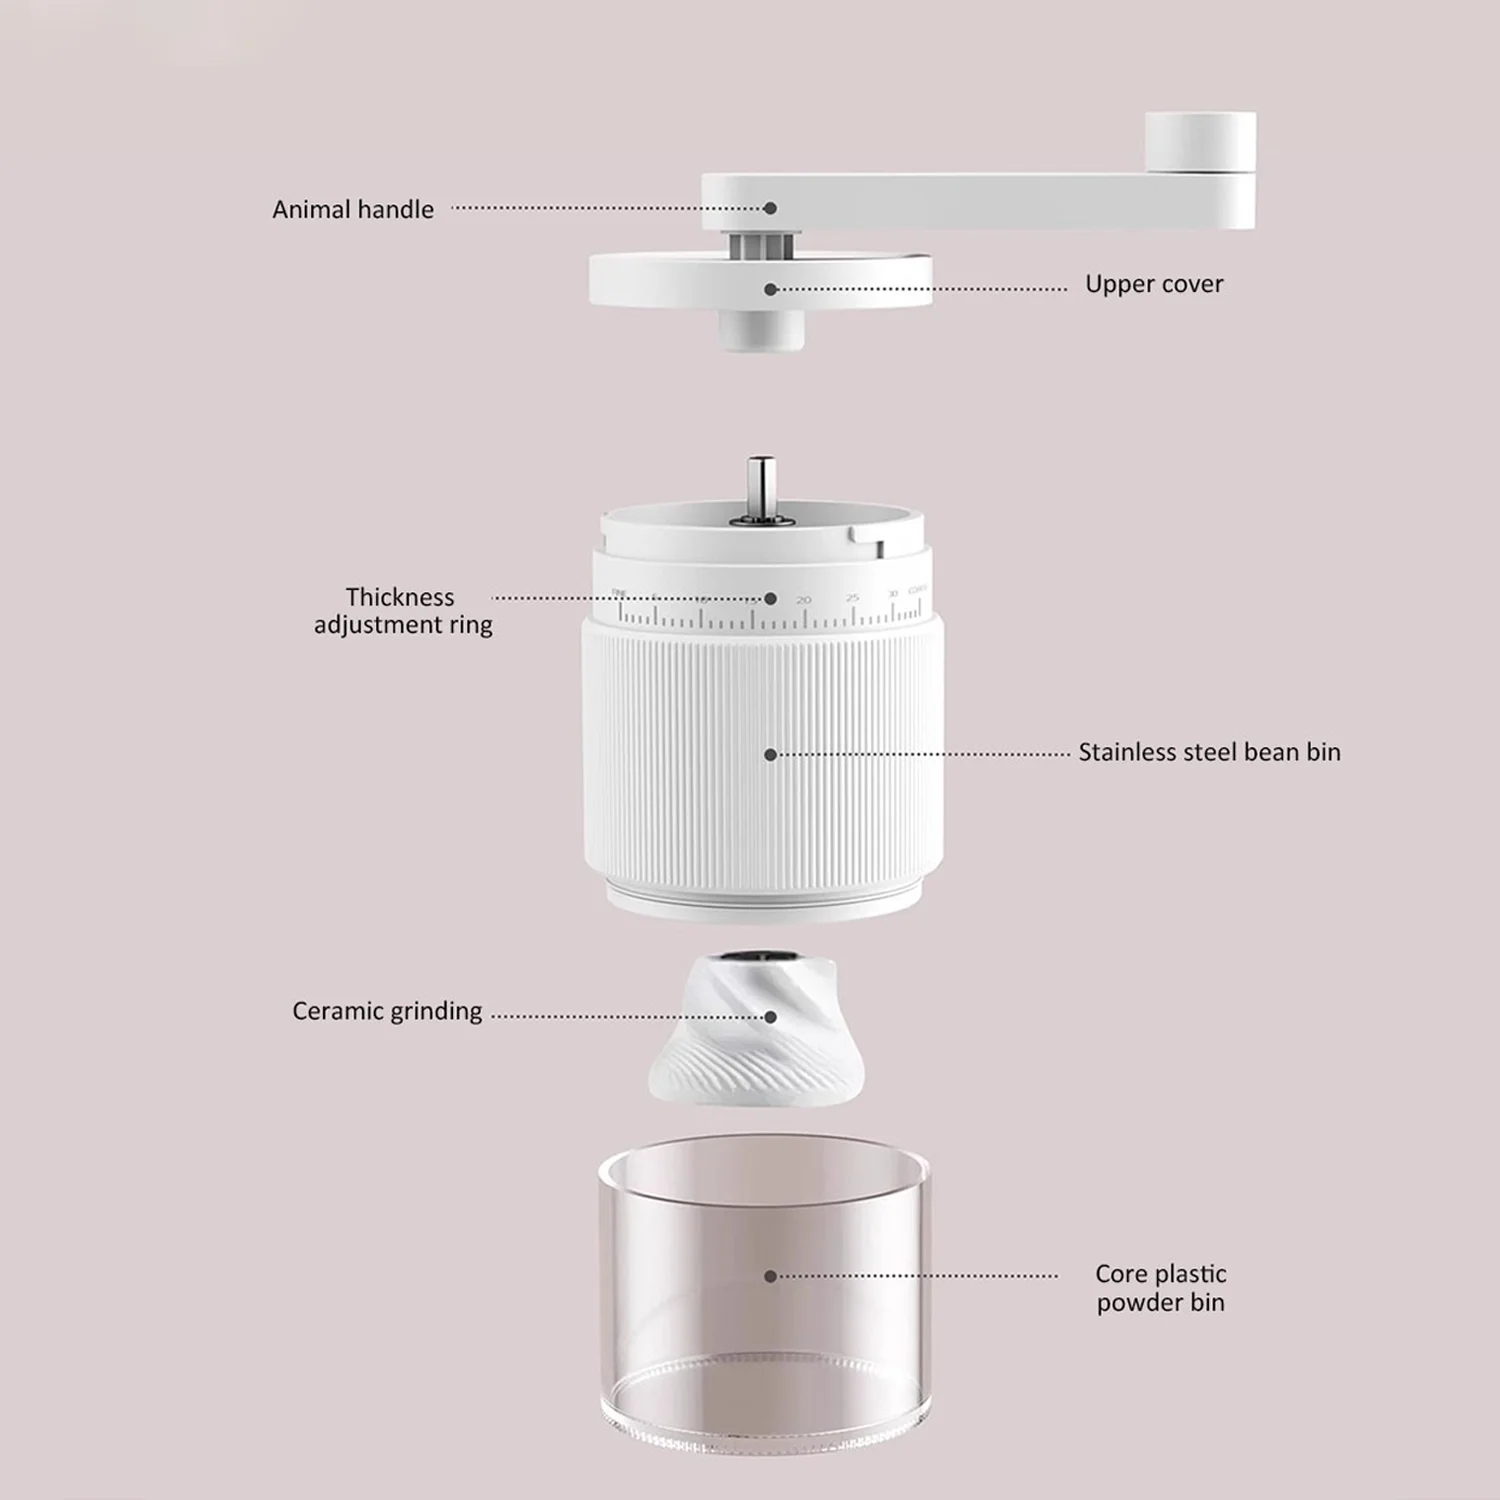
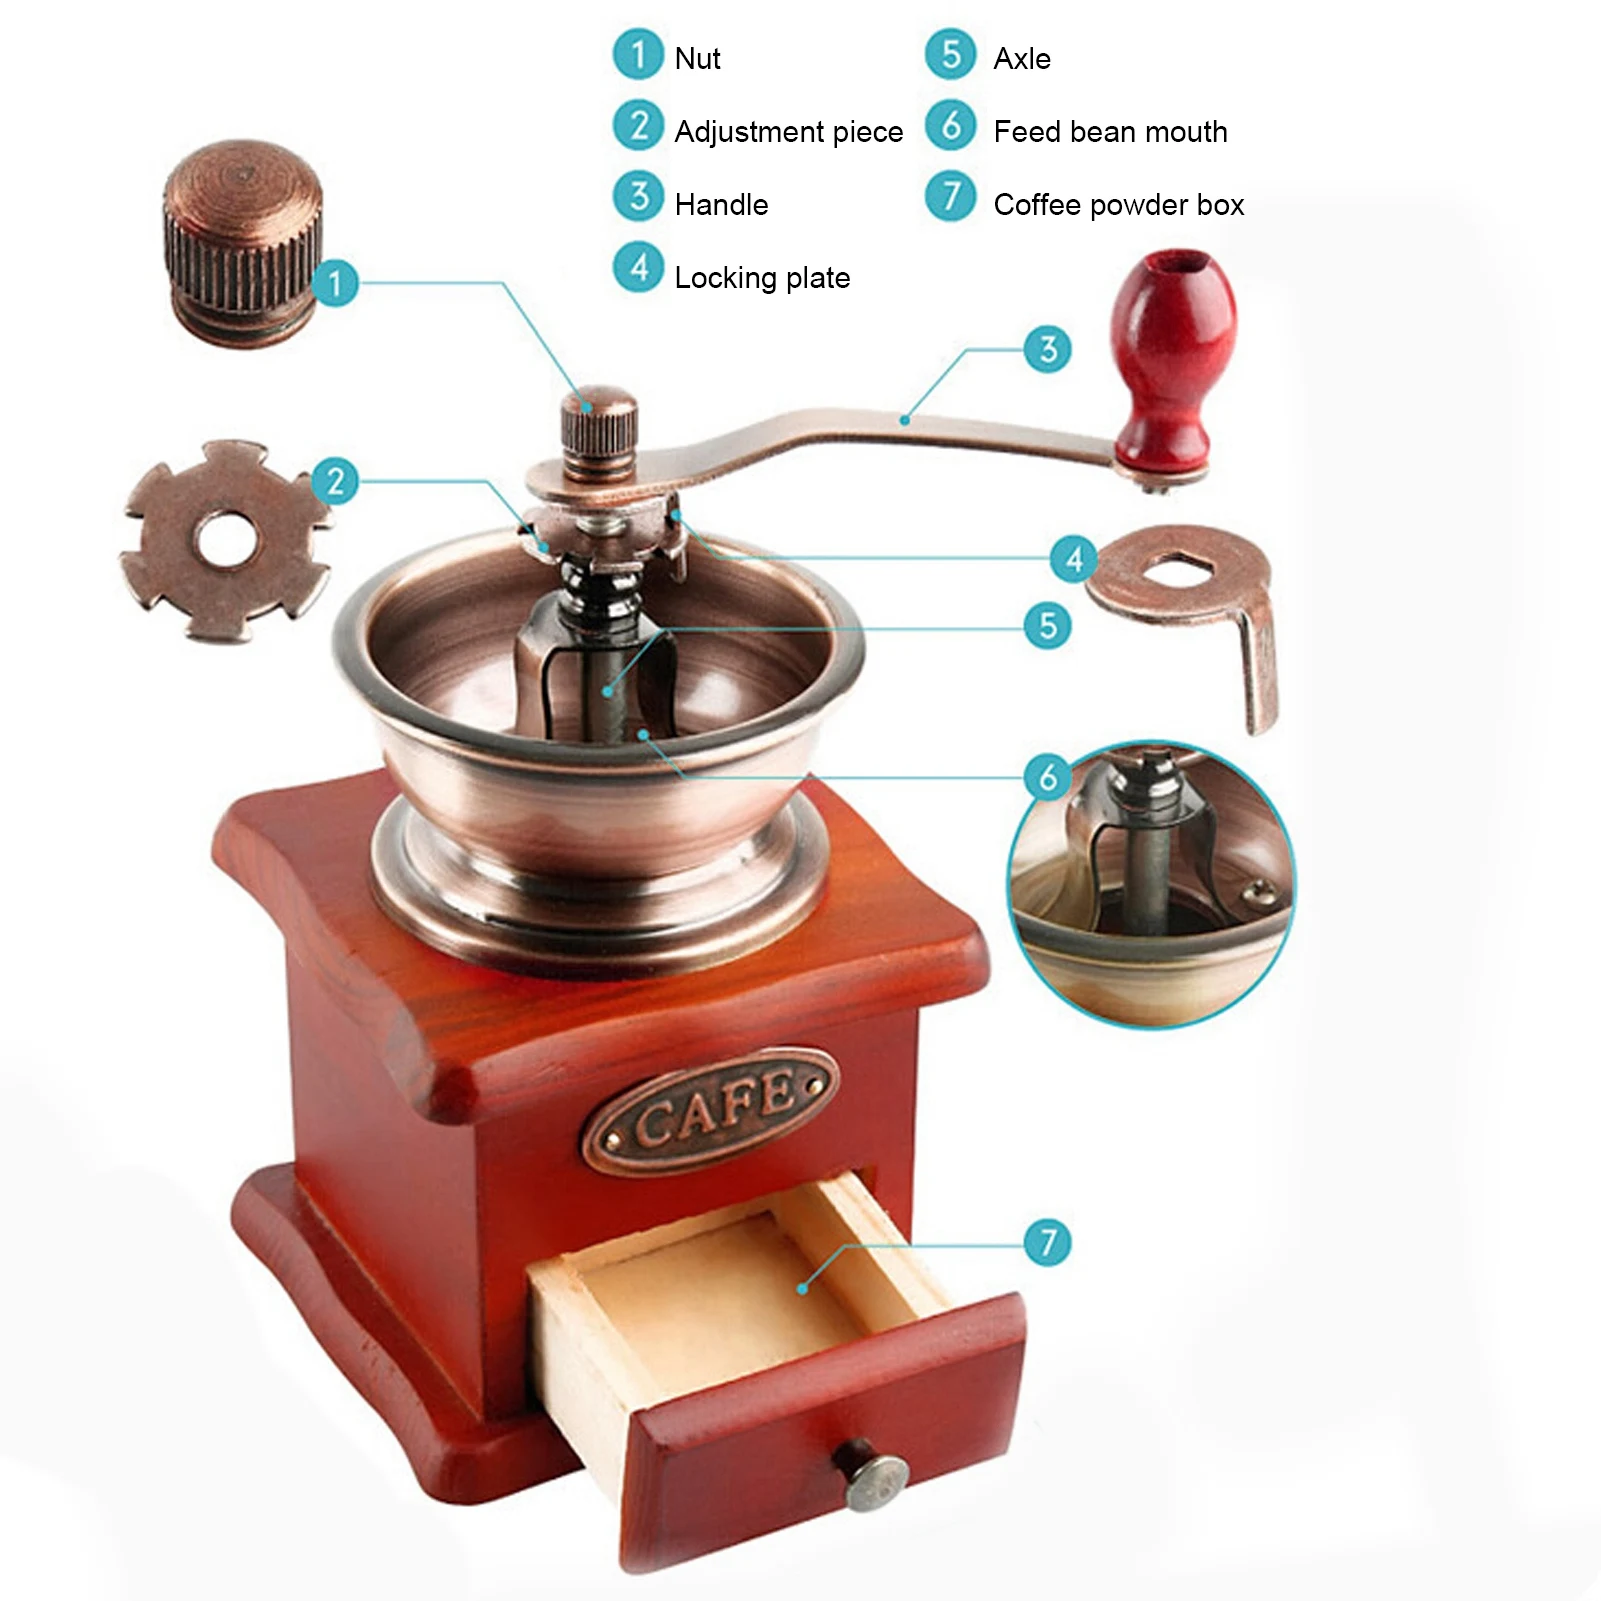
Master Disassembly: Taking Apart Your Grinder Safely
While specific designs vary, most manual grinders follow similar disassembly principles:
Remove the handle: Most attach with a nut or screw on top. Unscrew counterclockwise to detach.
Separate the hopper/top chamber: On many models, this unscrews from the body. Turn counterclockwise while holding the body steady.
Extract the inner burr mechanism: Depending on your model, this may require removing a small nut or simply lifting out the central shaft.
Remove the outer burr: In some models, this remains fixed in the body; in others, it can be removed for more thorough cleaning.
Disassemble the adjustment mechanism: If your grinder allows, carefully remove the adjustment dial and associated components.
Separate the grounds container: Usually detaches easily from the main body by unscrewing.
Warning: Never force components apart. If something doesn’t move easily, consult your manual or look for hidden fasteners.
Pro Tip: Note the original position of all adjustment settings before disassembly so you can restore your preferred grind size afterward.
Different hand burr grinder designs may have unique disassembly requirements, so move slowly and pay attention to how components fit together.

Cleaning Burrs: The Heart of Your Grinder
The burrs are your grinder’s most critical components, directly affecting coffee quality. Cleaning methods differ based on burr material:
Metal Burrs
Metal burrs (typically stainless steel) require dry cleaning methods to prevent rust and corrosion:
Brush thoroughly with a dry soft brush, focusing on the cutting edges and grooves where coffee particles accumulate.
Use wooden toothpicks or skewers to remove compacted grounds from tight spaces between cutting teeth.
For stubborn oil buildup, use a clean, dry microfiber cloth to wipe surfaces.
Never submerge metal burrs in water or use liquid cleaners, as this can cause oxidation and damage.
If absolutely necessary, use a cloth very lightly dampened with food-grade alcohol and dry immediately afterward.
Ceramic Burrs
Ceramic burr coffee grinders can tolerate slightly more moisture during cleaning:
Brush thoroughly to remove loose particles.
For stubborn residue, a slightly damp cloth can be used to wipe ceramic surfaces.
Allow ceramic burrs to dry completely before reassembly.
Even though ceramic resists moisture better than metal, avoid soaking these components.
Optional Cleaning Aids
For particularly stubborn buildup, specialized grinder cleaning pellets can absorb oils without water. These food-safe pellets are ground like coffee beans and carry away oils and residue without damage to the burrs.
Cleaning Secondary Components: Beyond the Burrs
While burrs receive the most attention, other components need proper cleaning for optimal performance:
Hopper/Bean Chamber
The bean chamber collects oils from whole beans before grinding. Wipe the interior with a dry microfiber cloth to remove residue. For plastic chambers, a lightly dampened cloth can remove stubborn oils, but ensure complete drying before reassembly.
Grounds Catcher
The grounds container often accumulates fine particles and oils. Clean thoroughly with a dry brush and cloth. If made of glass or plastic, these components can usually be washed with mild soap and water, then dried completely.
Adjustment Mechanisms
The grind adjustment components should be cleaned with special care:
1. Gently brush away coffee particles from threading and adjustment rings.
2. Avoid moisture on calibration components.
3. Keep lubricants away from these areas unless specifically recommended by the manufacturer.
External Housing
Handle the exterior based on its material:
– Wood: Wipe with a dry cloth only
– Metal: Clean with a slightly damp cloth followed by immediate drying
– Plastic: Can usually handle more thorough cleaning with a damp cloth
Using the right non-toxic cleaners for burr grinders ensures both safety and effectiveness without damaging delicate components.
The Critical Drying Process: Preventing Damage
Thorough drying is non-negotiable for grinder maintenance. Even minimal moisture can damage components or affect performance.
Best Drying Practices:
- Allow all components to air dry completely before reassembly (minimum 2-4 hours)
- Place parts on an absorbent towel in a well-ventilated area
- Avoid direct sunlight or heat sources that could warp plastic components
- Use a clean, dry microfiber cloth to hand-dry components when possible
- Pay special attention to crevices and threaded areas where moisture hides
- Consider using compressed air (low pressure) to speed drying in hard-to-reach areas
For stainless steel manual coffee grinders, be especially vigilant about drying all metal components completely to prevent oxidation or discoloration over time.
Reassembly: Putting Your Clean Grinder Back Together
Proper reassembly ensures your grinder functions correctly after cleaning:
Verify all components are completely dry before beginning reassembly.
Start with the burrs: Replace the outer burr first (if removable), ensuring it seats correctly in its designated position.
Install the inner burr and shaft: Align carefully and verify it rotates freely.
Reconnect the adjustment mechanism: Return to your pre-cleaning setting as a starting point.
Reattach the hopper/top chamber: Screw it on securely but avoid overtightening.
Reconnect the grounds container: Ensure it’s properly aligned and secured.
Reinstall the handle: Tighten appropriately—too loose and it will slip; too tight and it may damage threading.
Test functionality: Turn the handle to ensure smooth rotation before adding beans.
Calibrate if necessary: Grind a small amount of beans and adjust settings as needed to achieve your desired grind size.
If you encounter resistance during reassembly, stop immediately and check alignment. Forcing components can cause permanent damage.
Quick Daily Maintenance: Keeping Your Grinder Clean Between Deep Cleans
Implementing a 30-second daily routine significantly reduces the need for frequent deep cleaning:
Post-Grinding Brush: After each use, remove the grounds catcher and use a small brush to sweep away residual particles from the exit chute.
Tap Method: Gently tap the side of your grinder to dislodge grounds clinging to internal surfaces.
Empty Completely: Never store your grinder with ground coffee inside, as these particles accelerate oil buildup.
Exterior Wipe: Use a dry microfiber cloth to remove fingerprints and coffee dust from exterior surfaces.
Grind Through: Running a few beans through after cleaning helps carry away loose particles.
Grounds Catcher Care: Empty and wipe the collection chamber regularly to prevent stale grounds contaminating fresh ones.
These simple manual burr coffee grinder cleaning habits take minimal time but deliver significant benefits for flavor consistency and grinder longevity.


All-Metal Hand Grinder, Flat Burr Hand Grinder, Manual Espresso Grinder, Precision Manual Grinder
Price range: $716.96 through $717.43 Select options This product has multiple variants. The options may be chosen on the product page

Hand Burr Grinder, Hand Crank Coffee Grinder, Manual Espresso Grinder, Portable Coffee Grinder
Price range: $262.72 through $300.22 Select options This product has multiple variants. The options may be chosen on the product page
Manual Burr Mill, Manual Coffee Grinder Stainless Steel, Manual Coffee Mill Grinder, Mechanical Coffee Grinder
Price range: $127.26 through $130.32 Select options This product has multiple variants. The options may be chosen on the product page
All-Metal Hand Grinder, Compact Coffee Mill, Hand Burr Grinder, Travel Coffee Grinder
$212.33 Select options This product has multiple variants. The options may be chosen on the product page
Hand Burr Grinder, Manual Coffee Grinder Stainless Steel, Precision Manual Grinder
Price range: $183.64 through $187.52 Select options This product has multiple variants. The options may be chosen on the product page
Ceramic Burr Coffee Grinder, Hand Burr Grinder, Hand Crank Coffee Grinder, Manual Coffee Bean Grinder
Price range: $59.17 through $59.96 Select options This product has multiple variants. The options may be chosen on the product page
Critical Do’s and Don’ts for Manual Grinder Care
| DO | DON’T |
|---|---|
| Use dry brushes for regular cleaning | Submerge metal burrs or mechanical parts in water |
| Clean after switching between different coffee types | Use rice for cleaning (can damage burrs) |
| Allow components to dry completely before reassembly | Put any components in the dishwasher |
| Keep a regular cleaning schedule | Use harsh chemicals or detergents |
| Clean more frequently with darker, oilier roasts | Force stuck components during disassembly |
| Store in a clean, dry environment | Use compressed air at high pressure (can force debris deeper) |
| Use dedicated grinder cleaning tablets/pellets | Apply cooking oils or WD-40 to any components |
| Document your grind setting before disassembly | Scrub burrs with abrasive materials |
The myth of cleaning grinders with rice deserves special mention. While seemingly convenient, rice is harder than many coffee beans and can damage burr edges or overwork the grinding mechanism. Stick to proper cleaning methods to maintain consistent espresso extraction and avoid costly repairs.
Troubleshooting Common Grinder Issues Through Cleaning
Many performance problems can be resolved through proper cleaning:
Problem: Inconsistent Grind Size
Solution: Deep clean burrs and adjustment mechanism. Coffee oils create sticky residue that interferes with precise burr alignment. After cleaning, check for correct burr seating.
Problem: Difficult Turning/Grinding
Solution: Clean the central shaft and bearings. Coffee dust creates friction between moving parts, making grinding unnecessarily laborious.
Problem: Strange Tastes in Coffee
Solution: Complete deep cleaning to remove rancid oils. If taste persists after cleaning, verify no cleaning residue remains in the grinding chamber.
Problem: Squeaking or Grinding Noises
Solution: Check for coffee particles in the bearing mechanism. Clean thoroughly and ensure proper alignment during reassembly.
Regular cleaning helps maintain the ultimate espresso grind size consistency that espresso lovers depend on for perfect shots.
Long-Term Care for Your Manual Grinder Investment
Beyond regular cleaning, these practices ensure long-term performance:
Proper Storage: Store your grinder in a clean, dry place away from direct sunlight and moisture sources.
Bean Selection Awareness: Recognize that very oily, dark-roasted beans will require more frequent cleaning due to higher oil content.
Seasonal Maintenance: Schedule deep cleaning at regular intervals, especially before storing the grinder for extended periods.
Travel Considerations: When traveling with your grinder, ensure it’s clean and dry before packing to prevent mold growth or odor development.
Professional Assessment: Consider professional maintenance if you notice burr dullness or mechanical issues that cleaning doesn’t resolve.
By implementing these manual coffee grinder lifespan maximization practices, your quality manual grinder can provide decades of service, making it a truly sustainable addition to your coffee toolkit.
Is Your Cleaning Method Affecting Coffee Taste?
Q: Can cleaning products leave residue that affects flavor?
A: Absolutely. Soap, detergents, and chemical cleaners can leave residue that taints coffee flavor. This is why dry cleaning methods are preferred for most components.
Q: What’s the most flavor-neutral way to clean my grinder?
A: Brushing and wiping with dedicated tools, combined with food-grade grinder cleaning tablets, provides effective cleaning without introducing foreign flavors.
Q: How can I tell if my grinder is truly clean?
A: After cleaning, grind a small amount of beans and discard them. Then brew a cup using your standard method and taste carefully. Clean grinders produce clear, characteristic flavors without strange undertones.
Q: How long should I wait after cleaning before grinding for consumption?
A: After ensuring all components are completely dry, there’s no need to wait—though some users prefer to “season” newly cleaned burrs by grinding and discarding a few grams of beans first.
By maintaining your manual coffee grinder properly, you preserve not just the equipment but the exceptional flavor experience that premium coffee beans provide. At Savor Suite, we believe that meticulous grinder care is as essential to great coffee as the beans themselves.