
Why Clean Your Hand Coffee Grinder Regularly
A clean coffee grinder is essential for achieving that perfect cup of morning brew. When you neglect cleaning your manual coffee grinder, coffee oils build up on the burrs and other components, becoming rancid over time. This rancidity isn’t just unpleasant—it actively taints your fresh coffee with off-flavors that can ruin your brewing experience.
Coffee contains over 800 aromatic compounds that contribute to its complex flavor profile. These same compounds, particularly the oils, start deteriorating within 2-3 weeks at room temperature. As these oils go rancid, they create stale, bitter notes that mask the delicate flavors you’re trying to extract from your freshly ground beans.
Beyond flavor concerns, regular cleaning offers several benefits:
- Ensures consistent grind size for optimal extraction
- Prevents clogging that affects grinding efficiency
- Maintains the proper function of adjustment mechanisms
- Extends the overall lifespan of your precision grind settings
- Protects your investment in high-quality manual coffee burr grinders
A dirty grinder doesn’t just produce bad-tasting coffee—it creates inconsistent particle sizes that lead to uneven extraction. This inconsistency means some particles over-extract (creating bitterness) while others under-extract (causing sourness), ultimately diminishing the quality of your brew.
Now that you understand why cleaning is crucial, let’s explore how often you should clean your hand grinder.
Recommended Cleaning Frequency for Optimal Performance
The ideal cleaning schedule for your manual grinder depends on several factors, including how often you use it, what type of beans you grind, and their roast level. Following a regular maintenance schedule ensures your grinder performs at its best and delivers consistent results.
| Cleaning Type | Frequency | Actions |
|---|---|---|
| Light Cleaning | After each use | Brush out loose grounds, wipe external surfaces |
| Moderate Cleaning | Weekly (for daily users) | Basic disassembly, brush cleaning of burrs and chamber |
| Deep Cleaning | Monthly or every 1-2 lbs of coffee | Complete disassembly, thorough cleaning of all parts |
Factors that might increase your cleaning frequency include:
- Darker roast coffees, which contain more oils that can build up faster
- Flavored coffees, which leave behind sticky residues
- Very frequent use (multiple times daily)
- Grinding for espresso, which creates finer particles that compact in crevices
Users who primarily grind light roasts might extend their deep cleaning schedule, while those favoring darker, oilier beans should consider more frequent deep cleaning sessions to maintain optimal performance.
The effort you put into regular maintenance directly impacts flavor preservation in your daily brew. Even a quick cleaning after each use can significantly improve taste consistency and prevent oil buildup from becoming a more difficult problem later.
Now that you know when to clean your grinder, let’s gather the necessary tools for the job.
Essential Tools and Materials for Effective Cleaning
Having the right tools makes cleaning your manual coffee grinder both easier and more effective. Here’s what you’ll need to properly maintain your grinder:
Essential Cleaning Tools:
– Soft-bristled brush (an old toothbrush works well)
– Microfiber cloths for drying and polishing
– Cotton swabs for reaching tight spaces
– Small cleaning brushes (many grinders include one)
– Wooden skewer or toothpick for dislodging compacted grounds
Optional but Helpful Tools:
– Compressed air can for blowing out particles
– Grinder cleaning tablets or special coffee grinder cleaner
– Natural bristle brushes that are gentler on more delicate burr grinder components
– Soft makeup brushes for delicate parts
Cleaning Agents:
– Uncooked rice or specialized grinder cleaning pellets to absorb oils
– Non-toxic cleaners specifically formulated for coffee equipment
– Plain, dry paper towels (avoid using soap or liquid cleaners unless specified by the manufacturer)
Materials to Avoid:
– Harsh chemical cleaners that might leave residue or odors
– Abrasive brushes that could scratch burrs or other components
– Water for parts not explicitly marked as washable
– Dishwasher detergents or standard household cleaners
Remember that your cleaning approach should match your grinder’s construction materials. Wooden components require different care than metal or plastic parts.
With your cleaning supplies ready, let’s prepare your grinder for cleaning.
Preparation Steps Before Disassembly
A successful cleaning process begins with proper preparation. Taking these steps before disassembly will help ensure nothing gets lost or damaged during cleaning:
Create a suitable workspace – Find a clean, well-lit area with plenty of space. Lay down a light-colored towel or cloth to improve visibility and prevent small parts from rolling away.
Take reference photos – Before taking anything apart, snap a few photos of your assembled grinder from different angles. These will serve as visual guides during reassembly.
Empty the grinder completely – Make sure no beans remain in the hopper and tap out any loose grounds from the collection chamber.
Check your manual – If you still have the manufacturer’s guide, review any specific cleaning instructions for your model of hand burr grinder.
Prepare containers for parts – Set out small bowls or an egg carton to organize components during disassembly. This prevents parts from getting lost and helps you remember their order.
The time invested in preparation pays off when you aren’t searching for tiny screws or trying to remember how pieces fit together. Many grinders have small springs or washers that can easily disappear if not properly contained.
Now that you’re prepared, let’s begin the systematic disassembly process.
Detailed Disassembly Process for Hand Grinders
Disassembling your hand grinder correctly ensures you can clean all components thoroughly without causing damage. While specific steps vary between models, this general approach works for most manual coffee grinders:
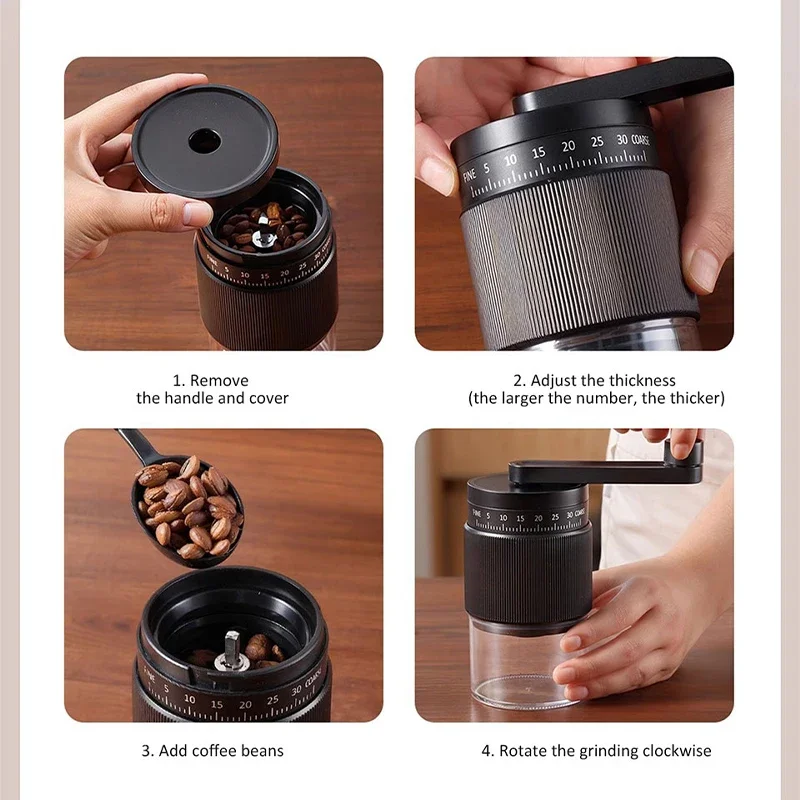
Remove the handle and top cap
– Unscrew or detach the handle (usually counterclockwise)
– Some handles have a small screw that needs to be loosened first
– Remove the top cap or lid that covers the bean hopperSeparate the hopper from the main body
– Unscrew the adjustment dial completely
– Carefully pull the inner burr shaft assembly from the main body
– Keep track of any washers or spacers that may come looseRemove the inner burr
– For most manual burr mills, the inner burr is attached to the central shaft
– Some models have a small screw or nut securing the burr to the shaft
– Others may have a clip or notch systemAccess the outer burr
– The fixed outer burr is usually housed in the main body
– Some models allow removal, while others have it permanently fixed
– If removable, carefully extract it without forcing anythingRemove the collection chamber or grounds bin
– Usually unscrews from the bottom of the main body
– Be careful of any additional washers or seals
Important Disassembly Tips:
– Never force components apart. If something won’t move, recheck the manual
– Remember how each piece aligns (note any markers or notches)
– Keep pieces in order of removal to make reassembly easier
– Be especially careful with springs in the adjustment mechanism
– Work over your prepared surface to catch any small parts that might fall
Different grinder designs require slight variations in this process. Conical burr grinders (the most common type) typically have the burrs arranged vertically, while flat burr designs might have a different disassembly sequence.
With your grinder now fully disassembled, we can address the cleaning of each individual component.
Component-Specific Cleaning Techniques
Cleaning the Burrs
The burrs are the heart of your grinder and require special attention during cleaning. How you clean them depends on whether they’re made of stainless steel or ceramic:
For Stainless Steel Burrs:
– Use a dry brush to remove coffee grounds from all crevices and teeth
– Pay special attention to the cutting edges and grooves where oils accumulate
– For stubborn buildup, use a wooden toothpick to carefully scrape between grooves
– Avoid excessive moisture that could lead to rust, especially on non-stainless components
For Ceramic Burrs:
– Ceramic burr coffee grinders require gentler handling as ceramic is more brittle than steel
– Use soft brushes with natural bristles rather than synthetic ones
– Clean with light pressure to avoid chipping the ceramic edges
– Ceramic can tolerate slightly more moisture than steel, but still avoid soaking
For both types, never submerge burrs in water unless specifically stated as safe by the manufacturer. The grooves and edges of burrs are precision-engineered, and their sharpness directly impacts grind quality.
Maintenance of the Central Shaft and Springs
The central shaft mechanism is crucial for consistent grinding:
- Wipe the central shaft with a dry cloth to remove coffee dust and oils
- Check springs for coffee particles that might affect tension
- Ensure any bearings move freely without resistance
- Clean threads carefully with a dry brush to ensure smooth reassembly
- Look for wear or damage that might indicate future problems
Coffee particles in spring mechanisms directly affect grind consistency by altering the pressure between burrs. Even a small amount of buildup can change your grind settings unexpectedly.
Grinder Body and External Components
Different materials require different cleaning approaches:
Wood Components:
– Wipe with a barely damp cloth, then immediately dry
– Avoid soaking or using excessive moisture
– Consider food-grade mineral oil for occasional conditioning
Metal Bodies:
– Clean with a dry or slightly damp cloth
– Polish stainless steel with a microfiber cloth
– Check for oxidation or discoloration
Plastic/Acrylic Parts:
– Wipe clean with a dry cloth
– Check for coffee oil residue in seams and corners
– Avoid abrasive cleaners that might scratch surfaces
Pay special attention to threading on all components, as proper cleaning ensures smooth reassembly and operation. A soft toothbrush works well for cleaning threads without damaging them.
Once all components are thoroughly cleaned, we can move on to properly drying and reassembling your grinder.
Proper Drying Techniques to Prevent Damage
Thorough drying is essential before reassembling your grinder to prevent potential damage and performance issues. Each component must be completely moisture-free to avoid problems like rust formation, mold growth, or damage to wooden parts.
Effective Drying Methods:
- Air drying is the safest option for most components
- Place parts on a clean, absorbent towel in a well-ventilated area
- Allow metal parts at least 30 minutes to dry completely
- Wooden components may need several hours, depending on humidity
- Use a clean microfiber cloth to accelerate drying for metal parts
Drying Times by Material:
– Metal burrs and components: 30-60 minutes
– Plastic/acrylic components: 20-30 minutes
– Wooden components: 2-4 hours minimum
Inadequate drying can lead to serious problems. Moisture trapped in the grinder can cause metal parts to rust, affecting both performance and the taste of your coffee. Wooden parts may warp or develop mold if reassembled while still damp. Proper espresso grind settings depend on perfectly clean and dry components.
Before proceeding to reassembly, double-check every piece, paying special attention to crevices and threaded areas where moisture might hide. Only when you’re certain everything is completely dry should you move on to putting your grinder back together.
With all components now clean and thoroughly dry, it’s time to reassemble your grinder.
Step-by-Step Reassembly Guide
Reassembling your hand grinder correctly ensures it will function properly and produce consistent results. Follow these steps in reverse order of how you disassembled your grinder:
Begin with the outer burr and body
– Make sure the outer burr is securely seated in the grinder body
– Check that it aligns with any notches or slots designed to hold it in place
– Ensure it sits flat and doesn’t wobbleAttach the inner burr to the central shaft
– Align any keying or notches that prevent the burr from spinning on the shaft
– Secure with any fasteners that were removed during disassembly
– Verify the burr is firmly attached but not over-tightenedInsert the shaft assembly through the body
– Carefully thread the shaft through the body of the grinder
– Ensure any bearings or bushings are properly positioned
– Add washers or spacers in their original positionsReattach the adjustment mechanism
– Replace any springs in their correct orientation
– Thread on the adjustment ring or nut
– Set it to a medium grind setting initially for testingConnect the bean hopper
– Attach the hopper to the main body
– Make sure it seals properly with no gapsReplace the handle and top cap
– Attach the handle securely but avoid over-tightening
– Make sure it turns freely without resistance
– Replace the top lid or cap
Common Reassembly Mistakes to Avoid:
– Forcing components together when they don’t align properly
– Forgetting to replace small washers or spacers
– Over-tightening threaded components
– Misaligning burrs, which can cause grinding issues
If you encounter resistance during reassembly, stop and check component alignment rather than forcing parts together. Refer to your reference photos or the manufacturer’s manual if you’re unsure about the correct positioning of any component.
With your grinder now reassembled, let’s ensure it’s performing optimally with these calibration steps.
Post-Cleaning Calibration and Testing
After reassembly, it’s important to verify that your grinder is functioning correctly before brewing your next cup of coffee. These calibration and testing steps help ensure optimal performance:
Check mechanical function first:
– Turn the handle to verify smooth rotation
– Test the adjustment mechanism by moving between coarse and fine settings
– Ensure all parts feel secure with no unusual movement or loosenessRun a test grind:
– Use a small amount of beans (about 5 grams or a teaspoon) for initial testing
– Choose an inexpensive coffee for this test rather than your premium beans
– Grind at a medium setting and observe the consistency of the groundsInspect the grounds:
– The grounds should be relatively uniform in size
– Look for any metal fragments that would indicate improper reassembly
– Check for unusual clumping that might suggest remaining oil residueListen carefully during grinding:
– The sound should be consistent and smooth
– There should be no metal-on-metal scraping noises
– The resistance should feel normal—not too tight or too loose
If everything checks out, adjust to your preferred grind setting and brew a test cup. Pay attention to extraction time and taste to confirm your grinder is performing as expected. Proper lubrication of hand coffee grinder burrs might be necessary if you notice any stiffness in the mechanism.
Now that your grinder is clean and functioning properly, let’s explore some maintenance tips to keep it in top condition.
Preventative Maintenance Tips Between Deep Cleanings
Implementing simple maintenance practices between deep cleanings will keep your grinder performing well and reduce the frequency of thorough cleanings. These habits take just moments but make a significant difference in maintaining grind quality.
- After each use, tap the grinder to dislodge remaining grounds and give it a quick brush
- Use the “puffing technique” by blowing short bursts of air into the empty grinder to remove loose grounds
- Store beans properly in airtight containers away from direct sunlight to minimize oil development
- Consider your bean selection – lighter roasts produce less oil and cause less buildup
- Use compressed air occasionally to blow out particles from hard-to-reach areas
- Grind a small amount of instant rice monthly to absorb oils (if recommended by your manufacturer)
- Keep the exterior clean to prevent oils from your hands transferring to the beans
Signs that indicate a deep cleaning is needed:
– Visible oil residue on burrs or in the grounds chamber
– Inconsistent grind size despite using the same setting
– Increased resistance when turning the handle
– Coffee tastes noticeably different or stale
Following these simple practices will greatly extend the time between deep cleanings while ensuring your daily coffee maintains its quality. Maximizing the lifespan of your manual grinder depends largely on these regular maintenance habits.
Even with regular maintenance, you might encounter some cleaning challenges. Let’s address common issues and their solutions.
Troubleshooting Common Cleaning Challenges
Q: My adjustment ring is stuck and won’t unscrew. What should I do?
A: Apply gentle heat by wrapping a warm (not hot) towel around the stuck area for a few minutes to expand the metal slightly, then try again. Alternatively, try cooling the ring with an ice pack to contract the metal. Never use pliers or tools that might damage the threading.
Q: There’s coffee oil residue that won’t come off with brushing alone. How can I remove it?
A: Try using specialized grinder cleaning tablets crushed into powder and run through the grinder. For stubborn residue, a tiny amount of food-grade alcohol on a cloth might help, but be sure to thoroughly dry all components afterward.
Q: I’m noticing rust spots on my grinder’s metal components. Can this be fixed?
A: For small spots, gently buff with a soft cloth. For more significant rust, use a paste of baking soda and water applied with a soft toothbrush, then thoroughly dry. Moving forward, ensure complete drying before reassembly.
Q: How can I reduce static electricity that causes grounds to cling everywhere?
A: The RDT method (Ross Droplet Technique) involves adding a single drop of water to your beans before grinding. This small amount of moisture reduces static without affecting grind quality. Also, grind into a metal container, which dissipates static better than plastic.
Q: My grinder feels gritty even after cleaning. What’s happening?
A: Fine coffee dust might be trapped in the bearings or thread systems. Try using compressed air to blow out these particles, or consider using a dry artist’s paintbrush to reach tight spaces.
Specialized Cleaning Products for Hand Grinders
While basic cleaning can be accomplished with household items, specialized products can make maintenance easier and more effective, especially for stubborn buildup or regular deep cleaning.
Commercial Grinder Cleaning Products:
– Grinder cleaning tablets (like Urnex Grindz) specifically formulated to absorb oils and remove residue
– Food-safe brush sets designed with shapes that match grinder components
– Compressed air canisters with precision nozzles for targeting small spaces
– Microfiber cloths designed for coffee equipment
Natural Alternatives:
– Uncooked white rice (though some manufacturers caution against this for certain grinders)
– Quick-cooking oats, which are softer than rice and may be gentler on burrs
– Food-grade baking soda for gentle abrasive cleaning of metal parts
Selecting the Right Products:
– For ceramic burrs, choose gentler cleaning methods and softer brushes
– Stainless steel manual coffee grinders can handle slightly more rigorous cleaning
– Wooden components benefit from specialized food-safe wood oils or conditioners
– Consider cost-effectiveness—expensive cleaning tablets may not be necessary for light users
When weighing specialized products against household alternatives, consider how frequently you use your grinder and how oily your preferred coffee beans are. Daily users grinding dark roasts might find commercial products worth the investment, while occasional users might do well with simpler methods.
Let’s address some frequently asked questions about hand grinder cleaning.


All-Metal Hand Grinder, Flat Burr Hand Grinder, Manual Espresso Grinder, Precision Manual Grinder
Price range: $716.96 through $717.43 Select options This product has multiple variants. The options may be chosen on the product page

Hand Burr Grinder, Hand Crank Coffee Grinder, Manual Espresso Grinder, Portable Coffee Grinder
Price range: $262.72 through $300.22 Select options This product has multiple variants. The options may be chosen on the product page
Manual Burr Mill, Manual Coffee Grinder Stainless Steel, Manual Coffee Mill Grinder, Mechanical Coffee Grinder
Price range: $127.26 through $130.32 Select options This product has multiple variants. The options may be chosen on the product page
All-Metal Hand Grinder, Compact Coffee Mill, Hand Burr Grinder, Travel Coffee Grinder
$212.33 Select options This product has multiple variants. The options may be chosen on the product page
Hand Burr Grinder, Manual Coffee Grinder Stainless Steel, Precision Manual Grinder
Price range: $183.64 through $187.52 Select options This product has multiple variants. The options may be chosen on the product page
Ceramic Burr Coffee Grinder, Hand Burr Grinder, Hand Crank Coffee Grinder, Manual Coffee Bean Grinder
Price range: $59.17 through $59.96 Select options This product has multiple variants. The options may be chosen on the product page
Frequently Asked Questions About Grinder Cleaning
Can I use water to clean my grinder?
Most manufacturers recommend against using water on burrs and internal mechanisms. Water can cause rust on metal parts and damage wooden components. If your manual specifically states certain parts are washable, ensure they are completely dry before reassembly.
How often should I replace burrs?
Quality steel burrs typically last through grinding 1500-2000 pounds of coffee before requiring replacement. Ceramic burrs may last longer but are more susceptible to breakage if dropped. Look for signs of dullness like inconsistent grind size or increased grinding time.
Does the cleaning method differ for ceramic vs. steel burrs?
Yes. Ceramic burrs are more brittle and require gentler handling with softer brushes. They can tolerate slight moisture better than some steel burrs but are more susceptible to chipping if cleaned with hard implements.
Is dishwasher cleaning safe for any components?
Generally, no. Dishwashers use harsh detergents and high heat that can damage precision components, dull burr edges, and harm wooden or plastic parts. Even “dishwasher safe” components may experience reduced longevity when regularly machine-washed.
Can I soak parts to remove stubborn residue?
Most grinder parts should not be soaked. If your manufacturer explicitly states certain components are waterproof, brief soaking in plain water might be acceptable, but immediate and thorough drying is essential.
How do I know if I’ve reassembled my grinder correctly?
Proper reassembly results in smooth handle rotation with consistent resistance. If you feel grinding or unusual resistance, or if the adjustment mechanism doesn’t work properly, disassemble and check for misaligned components.
Why a Clean Grinder Produces Superior Coffee
The impact of a clean grinder on your coffee experience cannot be overstated. When your burrs and grinding chamber are free from old coffee residue and rancid oils, you’re setting the stage for flavor clarity that lets you experience the full potential of your beans.
Clean burrs produce consistent particle sizes, which is fundamental to even extraction. When your grinder creates uniform grounds, water interacts with all particles similarly during brewing, leading to balanced extraction without the competing flavors of both under and over-extracted coffee. Studies show that extraction yields can increase by 1-2% with thoroughly cleaned equipment—a difference you can definitely taste in your cup.
The precision of your grinder directly affects how your coffee brews. When grinding mechanisms operate smoothly without residue interference, they create the exact particle size you’ve selected. This consistency allows you to make precise adjustments to dial in your perfect cup, whether you’re brewing espresso, pour-over, or French press.
Regular maintenance not only preserves the quality of your daily brew but also protects your investment in quality coffee equipment. A well-maintained manual grinder can provide years of reliable service, making each cleaning session a small investment in hundreds of future delicious cups of coffee.
By implementing the cleaning routine outlined in this guide, you’re ensuring that every cup of coffee you brew showcases the true character of your beans—their natural sweetness, unique origin characteristics, and delicate aromatic notes—rather than the stale, bitter remnants of coffees past.